Seats
Important safety notes
 WARNING
In order to avoid possible loss of vehicle
control, all seat, head restraint, steering
wheel and rear view mirror adjustments, as
well as fastening of seat belts, must be done
before setting the vehicle in motion.
WARNING
Do not adjust the driver's seat while driving.
Adjusting the seat while driving could cause the driver to lose control of the vehicle.
Never travel in a moving vehicle with the seat backrest in an excessively reclined position as this can be dangerous. You could slide under the seat belt in a collision. If you slide under it, the seat belt would apply force at the abdomen or neck. This could cause serious or fatal injuries. The seat backrest and seat belts provide the best restraint when the wearer is in a position that is as upright as possible and seat belts are properly positioned on the body.
WARNING
Your seat belt must be adjusted so that you
can correctly fasten your seat belt.
Observe the following points: - adjust the seat backrest until your arms are slightly angled when holding the steering wheel.
- adjust the seat to a comfortable seating position that still allows you to reach the accelerator/brake pedal safely. The position should be as far back as possible with the driver still able to operate the controls properly.
- adjust the head restraint so that it is as close to the head as possible and the center of the head restraint supports the back of the head at eye level.
- never place hands under the seat or near any moving parts while a seat is being adjusted.
Failure to do so could result in an accident and/or serious personal injury.
WARNING
The electrically adjustable seats can be
operated at any time. Therefore, do not leave
children unattended in the vehicle, or with
access to an unlocked vehicle. A child's
unsupervised access to a vehicle could result
in an accident and/or serious personal injury.
WARNING
According to accident statistics, children are
safer when properly restrained in the rear
seating positions than in the front seating
position. Thus, we strongly recommend that
children be placed in the rear seats whenever
possible. Regardless of seating position,
children 12 years old and under must be
seated and properly secured in an
appropriately sized infant restraint, toddler
restraint, or booster seat recommended for
the size and weight of the child. For additional
information, see "Children in the vehicle".
A child's risk of serious or fatal injuries is significantly increased if the child restraints are not properly secured in the vehicle and/or the child is not properly secured in the child restraint.
WARNING
For your protection, drive only with properly
positioned head restraints.
Adjust the head restraint so that it is as close to the head as possible and the center of the head restraint supports the back of the head at eye level. This will reduce the potential for injury to the head and neck in the event of an accident or similar situation.
Do not drive the vehicle without the seat head restraints. Head restraints are intended to help reduce injuries during an accident.
 To avoid damage to the seats
and the seat
heating, observe the following information:
- do not spill any liquids on the seats. If
liquid is spilled on the seats, dry them as
soon as possible.
- if the seat covers are damp or wet, do not switch on the seat heating. The seat heating should also not to be used to dry the seats.
- clean the seat covers as recommended; see the "Interior care" section.
- do not transport heavy loads on the seats. Do not place sharp objects on the seat cushions, e.g. knives, nails or tools.
The seats should only be occupied by passengers, if possible.
- when the seat heating is in operation, do not cover the seats with insulating materials, e.g. blankets, coats, bags, seat covers, child seats or booster seats.
When you move the seats, make
sure that
there are no objects in the footwell or
behind the seats. Otherwise, you could
damage the seats and the objects.
When the rear bench seat is
folded
forwards, the front seats cannot be moved
to their rearmost position. You could
otherwise damage the seats and the rear
bench seat.
Make sure that the sun visor
is folded up
before adjusting the backrest and head
restraint height. The head restraint and sun
visor could otherwise collide when the head
restraint is fully extended.
 It is not possible to remove the
head
restraints from the front seats. The rearcompartment
head restraints can be
removed.
Please contact an authorized Mercedes- Benz Center for more information.
Other topics:
- cargo compartment enlargement (folding the rear bench seat forwards).
Adjusting the seats electrically
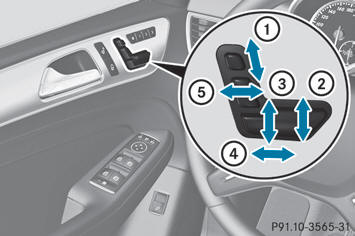
1 Head restraint height
2 Seat cushion angle
3 Seat height
4 Seat fore-and-aft adjustment
5 Backrest angle
Vehicles with memory function:
if PRE-SAFE
® has been triggered, the frontpassenger
seat will be moved to a better
position if it was previously in an
unfavorable position.
You can store the seat settings
using the
memory function.
Vehicles with memory function:
when the
seat is moved forwards or rearwards, the
headrest is moved up or down
automatically.
Adjusting the head restraints
Adjusting the head restraints manually
Adjusting the head restraint height
The head restraints must only
be removed
at a qualified specialist workshop.
Mercedes-Benz recommends that you use a Mercedes-Benz Center for this purpose.
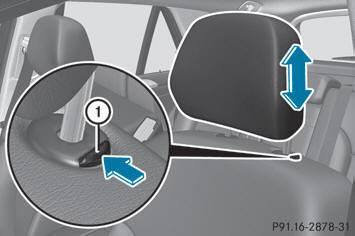
- To raise: pull the head restraint up to the desired position.
- To lower: press release catch 1 in the direction of the arrow and push the head restraint down to the desired position.
Adjusting the fore/aft position of the head restraint
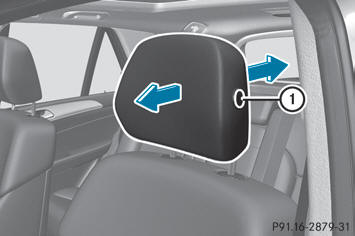
With this function you can adjust the distance between the head restraint and the back of the seat occupant's head.
- To adjust forwards: pull the head restraint forwards in the direction of the arrow until it engages.
There are several notches.
- To adjust rearwards: press and hold the release button 1 and push the head restraint back.
- When the head restraint is in the desired position, release the button and make sure that the head restraint is engaged in position.
Adjusting the head restraints electrically
- To adjust the head restraint height: slide the switch for head restraint adjustment up or down in the direction of the arrow.
Rear seat head restraints
WARNING
For safety reasons, always drive with the rear
head restraints in the upright position when
the rear seats are occupied.
Keep the area around head restraints clear of articles (e.g. clothing) to not obstruct the folding operation of the head restraints.
WARNING
For your protection, drive only with properly
positioned head restraints.
Adjust the head restraint in such a way that it is as close to the head as possible and the center of the head restraint supports the back of the head at eye level. This will reduce the potential for injury to the head and neck in the event of an accident or similar situation.
With a rear seat occupied, make sure to move the respective head restraint up from the lowest non-use position and have the occupant adjust the head restraint properly.
Do not drive the vehicle without the seat head restraints installed when the rear seats are occupied. Head restraints are intended to help reduce injuries during an accident.
Adjusting the rear seat head restraint height
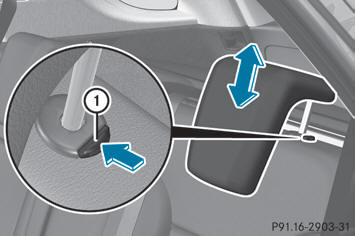
- If the head restraint is fully lowered, it is necessary to press release catch 1.
- To raise: pull the head restraint up to the desired position.
- To lower: press release catch 1 and push the head restraint down until it is in the desired position.
Adjusting the rear seat head restraint angle
Adjust the head restraints so that they are as close as possible to your head.
You can only adjust the two outer head restraints.
- Using both hands, reach backwards and grasp the sides of the head restraint.
- Pull the lower edge of the head restraint forwards or backwards until it is in the desired position.
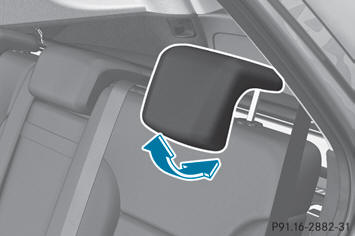
Removing and installing the rear seat head restraints
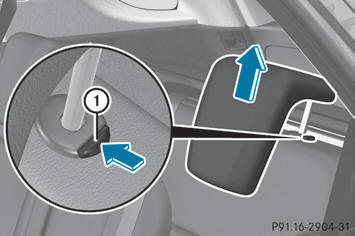
- To remove: pull the head restraint up to the stop.
- Press release catch 1 and pull the head restraint out of the guides.
- To re-install: insert the head restraint so that the notches on the bar are on the left when viewed in the direction of travel.
- Push the head restraint down until you hear it engage in position.
Adjusting the backrests in the 2nd row of seats
You can adjust the angle of the backrests in the second row of seats. There are ten detent positions to choose from.
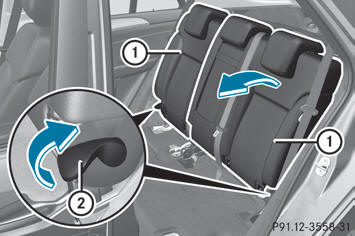
- Pull the left or right release lever 2 upwards in the direction of the arrow until the relevant backrest 1 is fully released.
- Pull the backrest 1 forwards in the direction of the arrow and allow it to engage.
- Lean back firmly against the backrest 1 to ensure it is engaged.
Adjusting the four-way lumbar support
You can adjust the contour of the front seat backrests individually to provide optimum support for your back.
1 To raise the backrest contour 2 To soften the backrest contour 3 To lower the backrest contour 4 To harden the backrest contour
Switching the seat heating on/off
Switching on/off
WARNING
Repeatedly setting the seat heating to level
3 may result in excessive seat temperatures.
The health of passengers that have limited temperature sensitivity or a limited ability to react to excessively high temperatures may be affected or they may even suffer burn-like injuries. Therefore, do not use seat heating level 3 repeatedly.
The three red indicator lamps in the button indicate the heating level you have selected.
If the battery voltage is too
low, the seat
heating may switch off.
Driver's and front-passenger seat
Rear-compartment seats
The system automatically switches down from level 3 to level 2 after approximately eight minutes.
The system automatically switches down from level 2 to level 1 after approximately ten minutes.
The system automatically switches off approximately 35 minutes after it is set to level 1.
- Make sure that the SmartKey is in position 1 or 2 in the ignition lock.
- To switch on: press button 1 repeatedly until the desired heating level is set.
- To switch off: press button 1 repeatedly until all the indicator lamps go out.
Problems with the seat heating
The seat heating has switched off prematurely or cannot be switched on. The vehicle's electrical system voltage is too low because too many electrical consumers are switched on.
- Switch off electrical consumers which you do not need, such as the rear window defroster or interior lighting.
Switching the seat ventilation on/off
Switching on/off
The three blue indicator lamps in the buttons indicate the ventilation level you have selected.
If the battery voltage is too
low, the seat
ventilation may switch off.
- Make sure that the SmartKey is in position 2 in the ignition lock.
- To switch on: press button 1 repeatedly until the desired ventilation level is set.
You can open the side windows
and the
sliding sunroof using the "Convenience
opening" feature. The seat
ventilation of the driver's seat
automatically switches to the highest level.
- To switch off: press button 1 repeatedly until all the indicator lamps go out.
Problems with the seat ventilation
The seat ventilation has switched off prematurely or cannot be switched on. The vehicle's electrical system voltage is too low because too many electrical consumers are switched on.
- Switch off electrical consumers which you do not need, such as the rear window defroster or interior lighting.
See also:
Mercedes-Benz G-Class Owners Manual
h1 {color: red;}
h2 {color: green;}
h3 {color: blue;}
h4 {color: #FF00FF;}
...
Uniform Tire Quality Grading
Standards
Overview of Tire Quality Grading
Standards
The Uniform Tire Quality Grading is a U.S.
Government requirement. Their purpose is to
provide drivers with consistent and reliable
information rega ...
Displaying the coolant temperature
WARNING
Driving when your engine is overheated can
cause some fluids which may have leaked into
the engine compartment to catch fire. You
could be seriously burned.
Steam from an overheated eng ...