Replacing bulbs
Important safety notes
Xenon bulbs
If your vehicle is equipped with Xenon bulbs, you can recognize this by the following: the cone of light from the Xenon bulbs moves from the top to the bottom and back again when you start the engine. For this to be observed, the lights must be switched on before starting the engine.
DANGER
Xenon bulbs carry a high voltage. You could
get an electric shock and be seriously or even
fatally injured if you touch the electric
contacts on Xenon bulbs. Therefore, never
remove the cover from Xenon bulbs.
Do not change Xenon bulbs yourself, but have them replaced at a qualified specialist workshop which has the necessary specialist knowledge and tools to carry out the work required.
Mercedes-Benz recommends that you use an authorized Mercedes-Benz Center for this purpose. In particular, work relevant to safety or on safety-related systems must be carried out at a qualified specialist workshop.
Bulbs and lamps are an important aspect of vehicle safety. You must therefore make sure that these function correctly at all times.
Have the headlamp setting checked regularly.
Other bulbs
There are bulbs other than the Xenon bulbs that you cannot replace. Replace only the bulbs listed. Have the bulbs that you cannot replace yourself changed at a qualified specialist workshop.
Mercedes-Benz recommends that you use an authorized Mercedes-Benz Center for this purpose. In particular, work relevant to safety or on safety-related systems must be carried out at a qualified specialist workshop.
If you require assistance changing bulbs, consult a qualified specialist workshop.
Do not touch the glass tube of new bulbs with your bare hands. Even minor contamination can burn into the glass surface and reduce the service life of the bulbs. Always use a lintfree cloth or only touch the base of the bulb when installing.
Only use bulbs of the correct type.
If the new bulb still does not light up, consult a qualified specialist workshop.
Bulbs and lamps are an important aspect of vehicle safety. You must therefore make sure that these function correctly at all times.
Have the headlamp setting checked regularly.
 WARNING
Bulbs and lamps can be very hot. You should
therefore allow them to cool down before you
change them. Otherwise, you could be burned
if you touch them.
Keep bulbs out of the reach of children.
Otherwise, they could damage the bulbs, for example, and injure themselves.
Never use a bulb which has been dropped.
Such a bulb may break or even explode and injure you.
Halogen bulbs are pressurized and can explode when you change them, particularly if they are very hot. You should therefore wear eye protection and gloves when you are changing them.
Overview: changing bulbs/bulb types
You can change the following bulbs. The bulb type can be found in the legend.
Halogen headlamps
1 Low-beam headlamp: H7 55 W 2 High-beam headlamp: H7 55 W 3 Parking lamp/standing lamp: W 5 W BV 4 Side marker lamp: WY 5 W
Tail lamp
1 Brake lamp: P 21 W-L
Changing the front bulbs
Removing and installing the cover in the front wheel arch
You must remove the cover from the front wheel housing before you can change the front bulbs.
- To remove: switch off the lights.
- Turn the front wheels inwards.
- Slide up cover 1 and lift it out.
- To install: insert cover 1 again and slide it downwards until it engages.
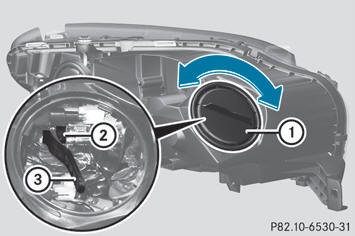
Low-beam headlamps (halogen headlamps)
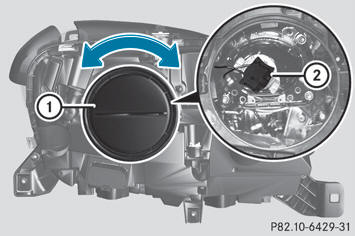
- Remove the cover in the front wheel arch.
- Turn housing cover 1 counter-clockwise and pull it out.
- Turn bulb holder 2 counter-clockwise and pull it out.
- Take the bulb out of bulb holder 2.
- Insert the new bulb into bulb holder 2.
- Insert bulb holder 2 into the lamp and turn it clockwise.
- Align housing cover 1 and turn it clockwise until it engages.
- Replace the cover in the front wheel arch.
High-beam headlamps (halogen headlamps)
- Switch off the lights.
- Open the hood.
- Turn housing cover 1 counter-clockwise and pull it out.
- Pull lever 3 upwards and remove bulb holder 2.
- Take the bulb out of bulb holder 2.
- Insert the new bulb into bulb holder 2.
- Simultaneously press bulb holder 2 and pull lever 3 downwards.
- Align housing cover 1 and turn it clockwise until it engages.
Parking lamps/standing lamps (halogen headlamps)
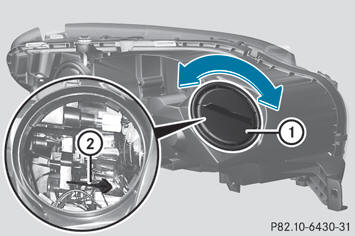
- Turn housing cover 1 counter-clockwise and pull it out.
- Pull out bulb holder 2.
- Take the bulb out of bulb holder 2.
- Insert the new bulb into bulb holder 2.
- Insert bulb holder 2.
- Align housing cover 1 and turn it clockwise until it engages.
Side marker lamps
- Remove the cover in the front wheel arch.
- Turn cap 2 counter-clockwise and remove it.
- Pull out bulb holder 1.
- Take the bulb out of bulb holder 1.
- Insert the new bulb into bulb holder 1.
- Insert bulb holder 1.
- Align cap 2 and turn it clockwise.
- Install the cover in the front wheel arch.
Changing the rear bulbs
Opening and closing the service flap
You must open the service flap in the cargo compartment before you can change the bulbs in the tail lamps.
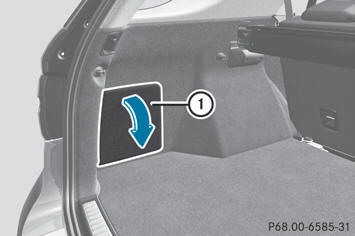
Left-hand service flap
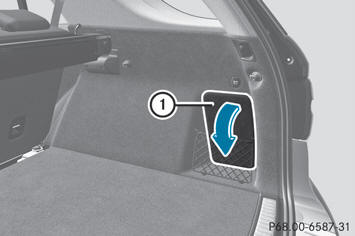
Right-hand service flap
- To open: release service flap 1 at the top, e.g. with a screwdriver, and swing it downward in the direction of the arrow.
- Right side: remove the first-aid kit beforehand and pull the parcel net down.
- To close: reinsert service flap 1.
Brake lamp
- Switch off the lights.
- Open the cargo compartment.
- Open the service flap.
1 Brake lamp
- Turn the bulb holder counter-clockwise and remove it.
- Remove the bulb from the bulb holder.
- Insert the new bulb into the bulb holder.
- Insert the bulb holder and turn it clockwise.
- Close the service flap
See also:
Parking the vehicle for a long period
If you leave the vehicle parked for longer than
four weeks, the battery may be damaged by
exhaustive discharge.
► Connecting a trickle charger.
You can obtain information about trickle
...
Menu overview
Press the or
button on the
steering wheel to call up the menu bar and
select a menu.
Operating the on-board computer .
Depending on the equipment installed in the
vehicle, you ca ...
Level control (vehicles with the
ON&OFFROAD package)
Important safety notes
WARNING
When the vehicle is being lowered, people
could become trapped if their limbs are
between the vehicle body and the wheels or
underneath the vehicle. There is a risk ...