Mounting a wheel
Preparing the vehicle
■ Vehicle with emergency spare wheel: when mounting the emergency spare wheel in the event of a flat tire, follow the additional notes on vehicle preparation under "Flat tire" .
■ Park the vehicle on firm, non-slippery and level ground.
■ Unload heavy luggage.
■ Apply the electric parking brake manually.
■ Bring the front wheels into the straight ahead position.
■ Shift the transmission to position P.
■ Switch off the engine.
■ Vehicles without KEYLESS-GO: remove the SmartKey from the ignition lock.
■ Vehicles with KEYLESS-GO: open the driver's door.
The on-board electronics have status 0, which is the same as the SmartKey having been removed.
■ Vehicles with KEYLESS-GO: remove the Start/Stop button from the ignition lock .
■ If included in the vehicle equipment, take the tire-change tool kit out of the vehicle.
■ Secure the vehicle to prevent it from rolling away.
Apart from certain country-specific variations, vehicles are not equipped with a tire-change tool kit. For information on which tools are required to perform a wheel change on your vehicle, consult an authorized Mercedes-Benz Center.
Necessary wheel-changing tools can
include, for example:
• Jack
• Wheel chock
• Lug wrench
Securing the vehicle to prevent it from rolling away
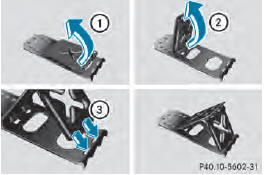
If your vehicle is equipped with a wheel chock, it can be found in the tire-change tool kit .
The folding wheel chock is an additional securing measure to prevent the vehicle from rolling away, for example when changing a wheel.
■ Fold both plates upwards 1.
■ Fold out lower plate 2.
■ Guide the lugs on the lower plate fully into the openings in base plate 3.
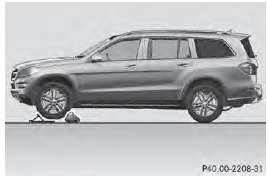
Securing the vehicle on level ground
■ On level ground: place chocks or other suitable items under the front and rear of the wheel that is diagonally opposite the wheel you wish to change.
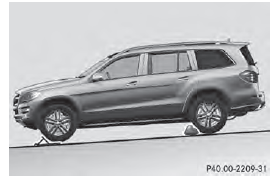
Securing the vehicle on slight downhill gradients
■ On light downhill gradients: place chocks or other suitable items in front of the wheels of the front and rear axle.
Raising the vehicle
WARNING
If you do not position the jack correctly at the appropriate jacking point of the vehicle, the jack could tip over with the vehicle raised.
There is a risk of injury.
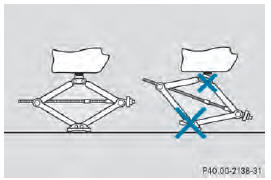
Only position the jack at the appropriate jacking point of the vehicle. The base of the jack must be positioned vertically, directly under the jacking point of the vehicle.
AMG vehicles with "Minispare" emergency spare wheel: use the "Minispare" emergency spare wheel only on the rear axle. If you mount the "Minispare" emergency spare wheel on the front axle, this could result in damage to the brake system.
If a tire on the front axle is defective, an intact wheel from the rear axle must first be replaced with the "Minispare" emergency spare wheel. The defective wheel on the front axle can then be replaced with the intact wheel from the rear axle.
Make sure to note the placard on the "Minispare" emergency spare wheel.
The jack is designed exclusively for jacking up the vehicle at the jacking points.
Otherwise, your vehicle could be damaged.
The following must be observed when raising
the vehicle:
• to raise the vehicle, only use the vehiclespecific
jack that has been tested and
approved by Mercedes-Benz. If used
incorrectly, the jack could tip over with the
vehicle raised.
• the jack is designed only to raise and hold the vehicle for a short time while a wheel is being changed. It is not suited for performing maintenance work under the vehicle.
• avoid changing the wheel on uphill and downhill slopes.
• before raising the vehicle, secure it from rolling away by applying the parking brake and inserting wheel chocks. Never disengage the parking brake while the vehicle is raised.
• the jack must be placed on a firm, flat and non-slip surface. On a loose surface, a large, load-bearing underlay must be used.
On a slippery surface, a non-slip underlay must be used, e.g. rubber mats.
• do not use wooden blocks or similar objects as a jack underlay. Otherwise, the jack will not be able to achieve its loadbearing capacity due to the restricted height.
• make sure that the distance between the underside of the tires and the ground does not exceed 1.2 in (3 cm).
• never place your hands and feet under the raised vehicle.
• never lie under the raised vehicle.
• never start the engine when the vehicle is raised.
• never open or close a door or the tailgate when the vehicle is raised.
• make sure that no persons are present in the vehicle when the vehicle is raised.
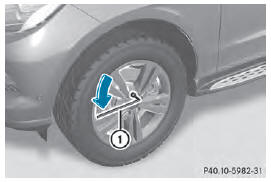
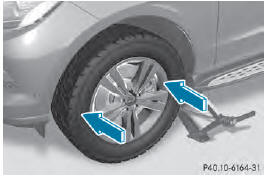
■ Using lug wrench 1, loosen the bolts on the wheel you wish to change by about one full turn. Do not unscrew the bolts completely.
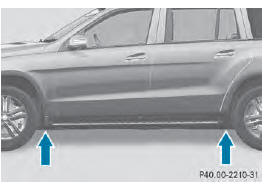
The jacking points are located just behind the front wheel housings and just in front of the rear wheel housings (arrows).
■ Take the ratchet wrench out of the vehicle tool kit and place it on the hexagon nut of the jack so that the letters AUF are visible.
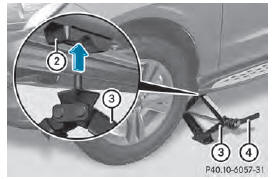
2 Jacking points
3 Jack
4 Crank
■ Position jack 3 at jacking point 2.
The alignment bolt on the jack must be inserted into the intended jacking point hole.
Example
■ Make sure the foot of the jack is directly beneath the jacking point.
■ Turn ratchet wrench 4 until jack 3 sits completely on jacking point 2 and the base of the jack lies evenly on the ground.
■ Turn ratchet wrench 4 until the tire is raised a maximum of 1.2 in (3 cm) from the ground.
Removing a wheel
Do not place wheel bolts in sand or on a dirty surface. The bolt and wheel hub threads could otherwise be damaged when you screw them in.
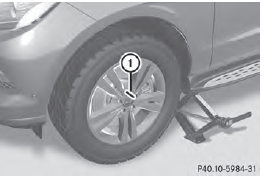
■ Unscrew the uppermost wheel bolt completely.
■ Screw alignment bolt 1 into the thread instead of the wheel bolt.
■ Unscrew the remaining wheel bolts fully.
■ Remove the wheel.
Mounting a new wheel
WARNING
Oiled or greased wheel bolts or damaged wheel bolts/hub threads can cause the wheel bolts to come loose. As a result, you could lose a wheel while driving. There is a risk of accident.
Never oil or grease wheel bolts. In the event of damage to the threads, contact a qualified specialist workshop immediately. Have the damaged wheel bolts or hub threads replaced/renewed. Do not continue driving.
WARNING
If you tighten the wheel bolts or wheel nuts when the vehicle is raised, the jack could tip over. There is a risk of injury.
Only tighten the wheel bolts or wheel nuts when the vehicle is on the ground.
To prevent damage to the paintwork, hold the wheel securely against the wheel hub while screwing in the first wheel bolt.
Always pay attention to the instructions and safety notes in the "Changing a wheel" section .
Only use wheel bolts that have been designed for the wheel and the vehicle. For safety reasons, Mercedes-Benz recommends that you only use wheel bolts which have been approved for Mercedes-Benz vehicles and the respective wheel.
Always use wheel bolts 2 to mount the "Minispare" emergency spare wheel. Using other wheel bolts to mount the "Minispare" emergency spare wheel could damage the brake system.
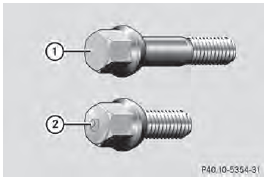
1 Wheel bolts for all wheels supplied by the
factory
2 Wheel bolts for the "Minispare"
emergency spare wheel
■ Clean the wheel and wheel hub contact surfaces.
■ Slide the wheel to be mounted onto the alignment bolt and push it on.
■ Tighten the wheel bolts until they are finger-tight.
■ Unscrew the alignment bolt.
■ Tighten the last wheel bolt until it is fingertight.
Lowering the vehicle
WARNING
The wheels could work loose if the wheel nuts and bolts are not tightened to the specified tightening torque. There is a risk of accident.
Have the tightening torque immediately checked at a qualified specialist workshop after a wheel is changed.
■ Place the ratchet wrench onto the hexagon nut of the jack so that the letters AB are visible.
■ Turn the ratchet wrench until the vehicle is once again standing firmly on the ground.
■ Place the jack to one side.
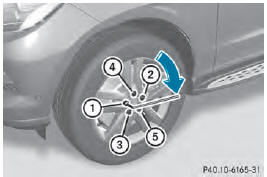
■ Tighten the wheel bolts evenly in a crosswise pattern in the sequence indicated (1 to 5). The tightening torque must be 110 lb-ft (150 Nm).
■ Turn the jack back to its initial position.
■ Stow the jack and the rest of the tirechange tool kit in the stowage well under the cargo compartment floor again.
■ Check the tire pressure of the newly installed wheel and adjust it if necessary.
Observe the recommended tire pressure .
Vehicles with tire pressure monitor: all wheels mounted must be equipped with functioning sensors.
See also:
Important safety notes
If you fail to adapt your driving style or
become distracted, the driving safety
systems can neither reduce the risk of
accident nor override the laws of physics.
Driving safety systems are mere ...
ATA (anti-theft alarm system)
■ To arm: lock the vehicle with the SmartKey
or KEYLESS-GO.
Indicator lamp 1 flashes. The alarm
system is armed after approximately
15 seconds.
■ To switch off using the SmartKey:
...
Rear view camera
Important safety notes
The rear view camera is only an aid. It is not
a replacement for your attention to your
immediate surroundings. You are always
responsible for safe maneuvering and
parking. ...