Replacing the wiper blades
Important safety notes
WARNING
For safety reasons, switch off the wipers and
remove the SmartKey from the starter switch
before replacing a wiper blade. Otherwise, the
wiper motor could suddenly turn on and cause
injury.
To avoid damaging the wiper blades, make sure that you touch only the wiper arm of the wiper.
Never open the hood if a windshield wiper arm has been folded away from the windshield.
Never fold a windshield wiper arm without a wiper blade back onto the windshield/ rear window.
Hold the windshield wiper arm firmly when you change the wiper blade. If you release the windshield wiper arm without a wiper blade and it falls onto the windshield, the windshield may be damaged by the force of the impact.
Mercedes-Benz recommends that you have the wiper blades changed at a qualified specialist workshop.
Removing the wiper blade
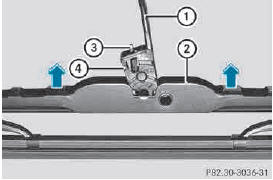
1 Windshield wiper arm
2 Wiper blade
3 Locking spring
4 Hinge piece
► Remove the SmartKey from the ignition lock.
► Fold wiper arm 1 away from the windshield until it engages.
► Position wiper blade 2 horizontally.
► Press locking spring 3.
► Slide wiper blade 2 with hinge piece 4 from wiper arm 1.
Installing the wiper blade
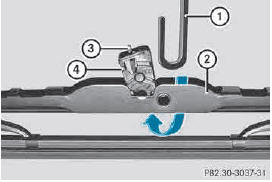
1 Windshield wiper arm
2 Wiper blade
3 Locking spring
4 Hinge piece
► Slide new wiper blade 2 with the recess onto wiper arm 1.
► Engage locking spring 3 into the end of the wiper arm.
► Make sure that wiper blade 2 is seated correctly.
► Fold wiper arm 1 back onto the windshield.
See also:
Engine oil
Notes on the oil level
Depending on the driving style, the vehicle
consumes up to 0.9 US qt (0.8 l) of oil over a
distance of 600 miles (1000 km). The oil
consumption may be higher than this when
...
Steering wheel paddle shifters
In the automatic drive program, you can
restrict or derestrict the shift range by using
steering wheel paddle shifters 1 and 2
.
In the manual drive program you can change
gears manually usin ...
Permissible trailer loads and drawbar
loads
Weight specifications
Maximum permissible gross vehicle
weight rating
The gross trailer weight is calculated by
adding the weight of the trailer to the weight
of the load and equipment on the tra ...