Combination switch
Turn signal
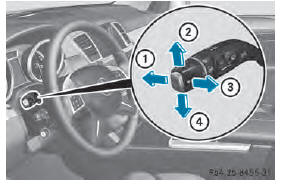
1 High-beam headlamps
2 Turn signal, right
3 High-beam flasher
4 Turn signal, left
■ To indicate briefly: press the combination switch briefly to the pressure point in the direction of arrow 2 or 4.
The corresponding turn signal flashes three times.
■ To indicate: press the combination switch beyond the pressure point in the direction of arrow 2 or 4.
High-beam headlamps
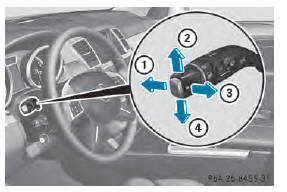
1 High-beam headlamps
2 Turn signal, right
3 High-beam flasher
4 Turn signal, left
■ To switch on the high-beam headlamps: turn the SmartKey in the ignition lock to position 2 or start the engine.
■ Turn the light switch to  or
or
 .
.
■ Press the combination switch beyond the
pressure point in the direction of
arrow :.
In the  position, the high-beam
headlamps are only switched on when it is
dark and the engine is running.
The blue  indicator lamp in the
instrument cluster lights up when the highbeam
headlamps are switched on.
■ To switch off the high-beam headlamps: move the combination switch back to its normal position.
The blue  indicator lamp in the
instrument cluster goes out.
Vehicles with Adaptive Highbeam Assist: when Adaptive Highbeam Assist is active, it controls activation of the high-beam headlamps .
High-beam flasher
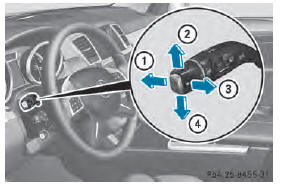
1 High-beam headlamps
2 Turn signal, right
3 High-beam flasher
4 Turn signal, left
■ To switch on: turn the SmartKey in the ignition lock to position 1 or 2 or start the engine.
■ Pull the combination switch in the direction of arrow 3.
See also:
Important safety notes
WARNING
Severe conditions (e.g. strong air pollution)
may require replacement of the filter before
its scheduled replacement interval. A clogged
filter will reduce the air volume to the interior
...
Switching the seat ventilation on/off
Activating/deactivating
Seat ventilation is only available for the front
seats.
The three blue indicator lamps in the buttons
indicate the ventilation level you have
selected.
► Make ...
Correct driver's seat position
Observe the safety guidelines on seat
adjustment.
- Check whether you have adjusted seat 3
properly.
Electrical seat adjustment
When adjusting the seat, make sure:
- you a ...