
Changing the front bulbs
Removing and installing the cover in the front wheel housing
You must remove the cover from the front wheel housing before you can change the front bulbs.
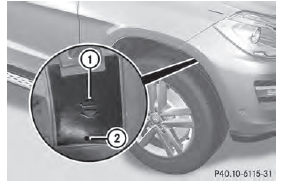
■ To remove: switch off the lights.
■ Turn the front wheels inwards.
■ Remove securing pin 2 using a suitable tool.
■ Slide cover 1 up and remove it.
■ To install: insert cover 1 again and slide it down until it engages.
■ Insert securing pin 2.
Low-beam headlamps (halogen headlamps)
WARNING
These bulbs are pressurized.
They can explode when being changed if: • they are still hot • they hit an object when being removed • they are dropped There is a risk of injury.
You should wear eye protection and clean gloves when you are changing a bulb. If necessary, have bulbs changed at a qualified specialist workshop.
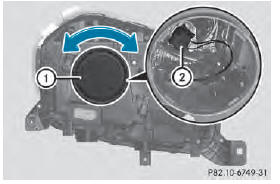
■ Remove the cover in the front wheel housing .
■ Turn housing cover 1 counter-clockwise and pull it out.
■ Turn bulb holder 2 counter-clockwise and pull it out.
■ Take the bulb out of bulb holder 2.
■ Insert the new bulb into bulb holder 2.
■ Insert bulb holder 2 into the lamp and turn it clockwise.
■ Align housing cover 1 and turn it clockwise until it engages.
■ Replace the cover in the front wheel housing .
High-beam headlamps (halogen headlamps)
WARNING
These bulbs are pressurized.
They can explode when being changed if:
• they are still hot • they hit an object when being removed • they are dropped There is a risk of injury.
You should wear eye protection and clean gloves when you are changing a bulb. If necessary, have bulbs changed at a qualified specialist workshop.
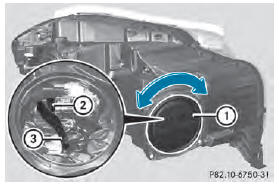
■ Switch off the lights.
■ Open the hood.
■ Turn housing cover 1 counter-clockwise and pull it out.
■ Pull lever = upwards and remove bulb holder 2.
■ Take the bulb out of bulb holder 2.
■ Insert the new bulb into bulb holder 2.
■ Simultaneously press bulb holder 2 and pull lever 3 downwards.
■ Align housing cover 1 and turn it clockwise until it engages.
See also:
Maintenance
The Service and Warranty Booklet describes
all the necessary maintenance work which
should be done at regular intervals.
Always have the Service and Warranty
Booklet with you when you bring the ...
Important safety notes
WARNING
The wheel or tire size as well as the tire type
of the spare wheel or emergency spare wheel
and the wheel to be replaced may differ.
Mounting an emergency spare wheel may
severely impai ...
SmartKey functions
WARNING
If children are left unsupervised in the vehicle,
they could:
• open the doors, thus endangering other
people or road users.
• get out and disrupt traffic.
• operate the vehicle's equipm ...