Refueling
Fuel filler flap

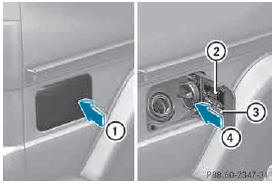
Example: G 550 fuel filler cap
1 To open the fuel filler flap
2 Tire pressure table
3 Fuel type
4 To insert the fuel filler cap
When you open or close the vehicle with the SmartKey, the fuel filler flap is automatically unlocked or locked.
The position of the fuel filler cap is displayed
 in the instrument cluster. The
arrow
next to the filling pump indicates the side of
the vehicle. The fuel filler flap is located to the
rear on the right.
Opening
1 To open the fuel filler flap
2 Tire pressure table
3 Fuel type
4 To insert the fuel filler cap
► Switch off the engine.
When the engine is running and the fuel filler flap is open, the yellow reserve fuel warning lamp and the = (USA only) or 2 (Canada only) Check Engine warning lamp may light up.
Further information about warning and indicator lamps in the instrument cluster can be found in the Digital Operator's Manual.
► Remove the SmartKey from the ignition lock.
► Press the fuel filler flap in the direction of arrow 1.
The fuel filler flap opens slightly.
► Open the fuel filler flap.
► Turn the fuel filler cap counterclockwise and remove it.
► Insert the fuel filler cap into the holder bracket on the inside of filler flap 4.
► Completely insert the filler neck of the fuel pump nozzle into the tank and refuel.
Do not add any more fuel after the pump stops filling for the first time. Otherwise, fuel may leak out.
Closing
► Replace the fuel filler cap and turn it clockwise. The fuel filler cap audibly engages.
► Close the fuel filler flap.
Close the fuel filler flap before locking the vehicle. A locking pin otherwise prevents the fuel filler flap from closing after the vehicle has been locked.
See also:
Sun visors
Overview
WARNING
If the mirror cover of the vanity mirror is folded
up when the vehicle is in motion, you could be
blinded by incident light. There is a risk of an
accident.
Always keep the mi ...
Regular checking of wheels and tires
WARNING
Damaged tires can cause tire inflation
pressure loss. As a result, you could lose
control of your vehicle. There is a risk of
accident.
Check the tires regularly for signs of damage
an ...
Towing a trailer
There are numerous legal requirements
concerning the towing of a trailer, e.g. speed
restrictions. Make sure that your vehicle/
trailer combination complies with the local
requirements not only in ...