Stowage areas
Stowage compartments
Important safety notes
 WARNING
To help avoid personal injury during a collision
or sudden maneuver, exercise care when
storing objects in the vehicle. Put luggage or
cargo in the cargo compartment if possible.
Do not pile luggage or cargo higher than the seat backrests.
If so equipped, always use the cargo net when transporting cargo. The cargo net cannot secure hard or heavy objects.
Parcel nets cannot secure hard or heavy objects.
Keep compartment lids closed. This will help
to prevent stored objects from being thrown
about and injuring vehicle occupants during
- braking
- vehicle maneuvers
- an accident
Stowage compartments in the front
Glove box

The glove box can be cooled.
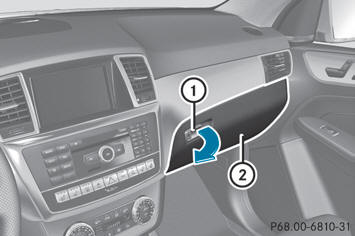
– To open: pull handle 1 and open glove box flap 2.
– To close: fold glove box flap 2 upwards until it engages.
The glove box can only be locked and unlocked using the mechanical key.
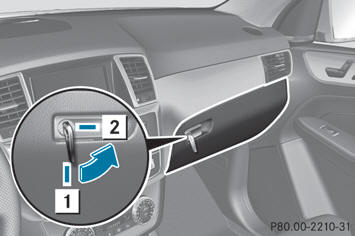
1 Glove box unlocked
2 Glove box locked
A partition for stowing flat objects is located in the upper section of the glove box. It can be removed to increase the stowage space in the glove box.
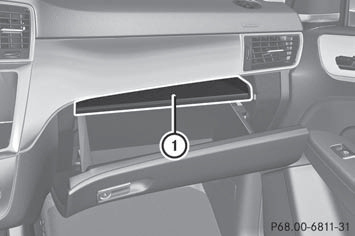
– To remove: pull out partition 1 forwards – To install: insert partition 1 and push it back until it engages.
Eyeglasses compartment
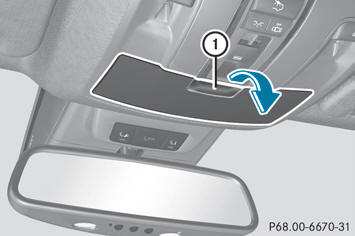
– To open: press marking 1.
Stowage compartments in the rear
Stowage pockets
WARNING
Storage bags are intended for storing lightweight
items only.
Heavy objects, objects with sharp edges or fragile objects may not be transported in the storage bag. In an accident, during hard braking, or sudden maneuvers, they could be thrown around inside the vehicle and cause injury to vehicle occupants.
Storage bags cannot protect transported goods in the event of an accident.
Storage bags are located in the rear compartment on the driver's and frontpassenger seat backrests.
Parcel nets
WARNING
Vehicles with Occupant Classification System
(OCS)
Do not place objects with a combined weight
of more than 4.4 lbs (2 kg) into the parcel net
on the back of the front passenger seat.
Otherwise, the OCS may not be able to properly approximate the occupant weight category.
WARNING
Parcel nets are intended for storing lightweight
items only, such as road maps, mail,
etc.
Heavy objects, objects with sharp edges, or fragile objects may not be transported in the parcel nets. In an accident, during hard braking, or sudden maneuvers, they could be thrown around inside the vehicle and cause injury to vehicle occupants.
Parcel nets cannot protect transported goods in the event of an accident.
Parcel nets are located in the front-passenger footwell and on the back of the driver's and the front-passenger seat.
Through-loading facility in the rear compartment
WARNING
Do not transport any unsecured items in the
through-loading area.
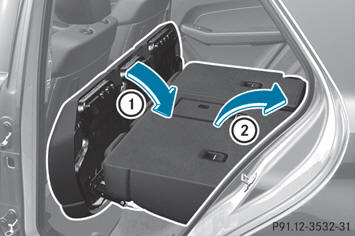
The through-loading facility is opened from the cargo compartment.

– Unlatch the rear seat backrests and tilt them in the cargo/load position.
– Fold down the rear seat armrest.
– Pull the center head restraint on the rear bench seat into the uppermost position.
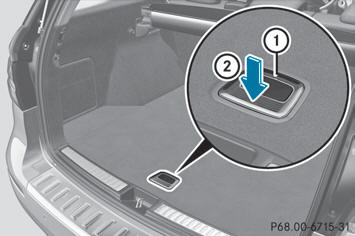
– Slide release catch 1 to the left and swing flap 2 to the left until it is lying on the rear side of the rear bench seat.
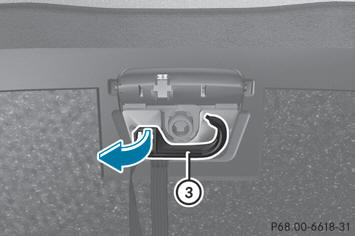
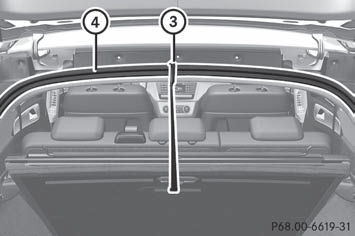
– Push cover 3 forward until it is lying on the rear seat armrest.
Cargo compartment enlargement
Important safety notes
WARNING
When expanding the cargo volume, always
fully fold the corresponding seats and, if so
equipped, always use the cargo net when
transporting cargo.
Unless you are transporting cargo, the seat backrests must remain properly locked in the upright position.
In an accident, during hard braking or sudden maneuvers, loose items will be thrown around inside the vehicle. This can cause injury to vehicle occupants unless the items are securely fastened in the vehicle.
Always use the cargo tie-down rings.
WARNING
Never drive a vehicle with the tailgate open.
Deadly carbon monoxide (CO) gases may enter vehicle interior resulting in unconsciousness and death.

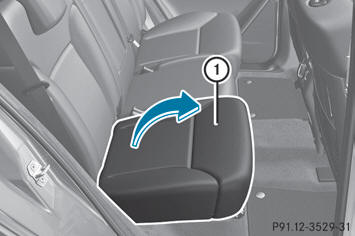
Fold the seat cushion upwards before
folding the rear bench seat forward.
Otherwise, the backrests may be damaged.
When the backrest is folded forwards, the front seats should not be moved to their rearmost position. Otherwise, the front seats and the rear bench seat could be damaged.
The left-hand and right-hand rear seat backrests can be folded forwards separately to increase the cargo compartment capacity.
Folding the rear bench seat forwards
If the driver's or front-passenger seat is
set for a larger person, it may not be
possible to fold the rear bench seat
forwards. In this case, move the front seats
as far forward as possible.
– Move the head restraints to the lowest position.
– Fold seat cushion 1 upwards.
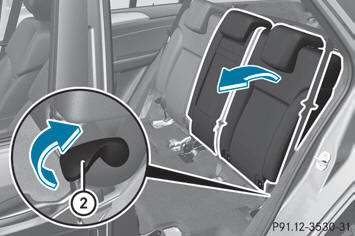
– Pull release catch 2 upwards in the direction of the arrow until the backrest is completely unlocked.
The backrest is heavy. Therefore, take
care when folding it down. Make sure that
the head restraints are pushed all the way
in so that the backrests and seat cushions
are not damaged.
– Fold the backrest forwards until it reaches the cargo compartment position.

– Guide seat belts 2 under respective clips 1.
Folding the rear bench seat back
– Fold seat backrest 2 back until it engages.
– Swing seat cushion 1 back.
– Pull up and adjust the head restraints if necessary.
Securing cargo
Cargo tie-down rings
Observe the following notes on securing
loads:
- secure the load using the cargo tie down
rings.
- do not use elastic straps or nets to secure a load, as these are only intended as an anti-slip protection for light loads.
- do not route tie downs across sharp edges or corners.
- pad sharp edges for protection.
There are four cargo tie down rings in the cargo compartment. Before using the cargo tie down rings on the front right-hand side of the cargo compartment, the parcel net must be pushed down.
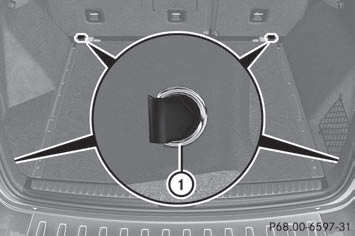
1 Cargo tie down rings
Bag hooks
The bag hook can bear a maximum load
of 6.6 lbs (3 kg). Do not use it to secure a
load.
There is a bag hook in the cargo compartment on the left-hand side.
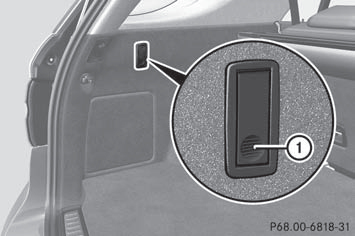
– Press the marking on bag hook 1.
– Turn bag hook 1 until it engages.
Securing hooks
Only use the mounting hooks to secure items of luggage up to maximum of 9 lbs (4 kg) in weight.
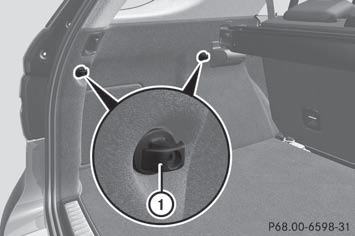
There are two securing hooks 1 on each side of the cargo compartment.
Cargo compartment cover
Important safety notes
When loading the vehicle, make sure that
you do not stack the load in the cargo
compartment higher than the lower edge of
the side windows. Do not place heavy
objects on top of the cargo compartment
cover.
A cargo compartment cover or a combined cargo cover and net (cargo compartment cover with cargo net) is attached, depending on equipment, behind the rear bench seat backrest.
Extending and retracting the cargo compartment cover
– To extend: pull the cargo compartment cover back by grab handle 1 and clip it into retainers 2 on the left and right.
– To retract: unhook the cargo compartment cover from retainers 2 on the left and right and guide it forwards by grab handle 1 until it is fully retracted.
Removing/installing the cargo compartment cover (without integrated cargo net)
– To remove: make sure that cargo compartment cover 1 is rolled up.
– Press in end cap 3 of cargo compartment cover 1 on the right or left side in the direction of the arrow and press cargo compartment cover 1 into anchorage 2 opposite it.
– Remove cargo compartment cover 1.
– To install: set cargo compartment cover 1 on the right or left-hand side in anchorage 2.
– Push in opposite end cap 3 of cargo compartment cover 1 in the direction of the arrow and insert cargo compartment cover 1 into opposite anchorage 2.
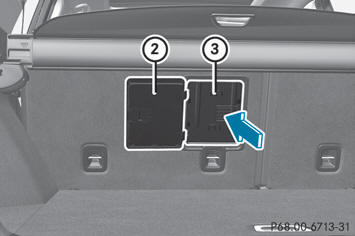
Removing/installing the cargo compartment cover with integrated cargo net
You can install and remove the combined cargo cover and net from the cargo compartment.
– Make sure that the cargo net and the cargo compartment cover are rolled up.
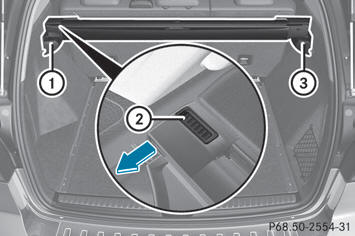
– To remove: press button 2.
– Swing the combined cargo cover and net in the direction of the arrow.
– First, detach the combined cargo cover and net from left-hand catch 1 and then remove it from right-hand fixture 3.
– To install: push the combined cargo cover and net up to the stop into right-hand fixture 3.
– Place the combined cargo cover and net into the left-hand fixture and push it into catch 1 until the combined cargo cover and net engages audibly.
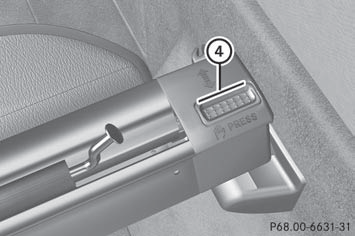
– Make sure that red lock status indicator 4 is no longer visible. The combined cargo cover and net will otherwise not be locked in place.
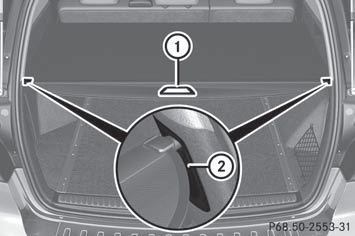
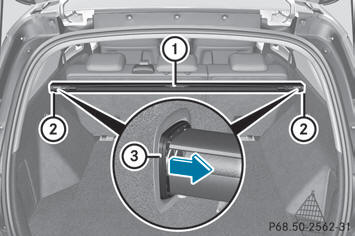
Cargo net in combined cargo compartment cover and net
Important safety notes
It is particularly important to use a safety net if the vehicle is loaded with small objects above the level of the backrests. For safety reasons, always use a cargo net when transporting loads.
Attaching the cargo net
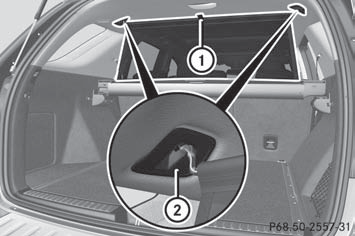
– Pull the cargo net up by tab 1 and hook it into eyelets 2 using both hands.
Coat hooks on the tailgate
WARNING
The tailgate may close if too great a load is
placed on the coat hooks.
You and/or others could be trapped and injured.
Only use the coat hooks for light clothing.
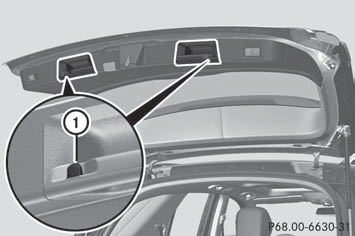
1 Coat hooks
EASY-PACK load-securing kit
Components and storage
The EASY-PACK load-securing kit allows you to use your cargo compartment for a variety of purposes. The accessory parts are located under the trunk floor.
– Open the trunk floor.

EASY-PACK load-securing kit accessory parts
1 Bag containing the brackets and luggage holder 2 Telescopic rod
Inserting the brackets into the loading rail
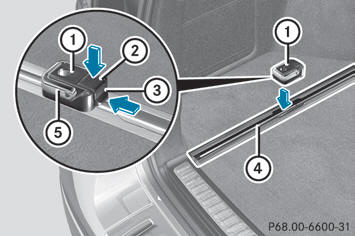
– Insert bracket 1 into the center of loading rail 4.
– Press release button 2 and push bracket 1 into the desired position in loading rail 4.
– Let go of release button 2.
– Press locking button 3.
Bracket 1 is locked in loading rail 4.
– If necessary, fold cargo tie-down ring 5 upwards.
WARNING
Distribute the load on the cargo tie down rings
evenly.
Otherwise, vehicle occupants could be
injured by objects being thrown around if you:
- brake sharply
- change direction suddenly
- are involved in an accident
Please observe the loading guidelines.
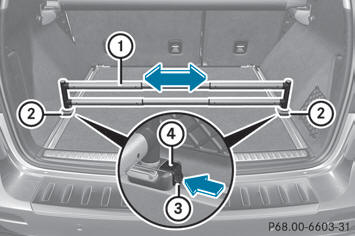
Luggage holder
The luggage holder can be used to secure light loads against the side wall of the cargo compartment to prevent them from moving around.
Only use the luggage holder to secure
cargo with a maximum weight of 15.4 lb
(7 kg) and with dimensions that the luggage
holder can safely and securely contain.
– To install: insert two brackets 5 into the left or right loading rail.
– Press release button 1 of the luggage holder and pull the strap out slightly.
– Insert luggage holder 2 into brackets 5 and, while doing so, press release button 3 and push the luggage holder downwards until it engages.
– Press release button 1 of the luggage holder and pull the strap out in the direction of the arrow.
– Place the load between the strap and the cargo compartment side wall.
– Using one hand, press locking button 1 of the luggage holder.
– With your other hand, let the strap go slowly until the load is secured.
– Make sure that locking button 4 on brackets 5 is pressed.
This keeps brackets 5 in place on the loading rail.
– To remove: press release button 3 on respective bracket 5 and remove luggage holder 2 by pulling upwards and out.
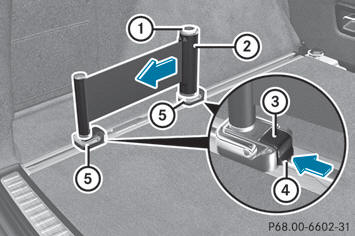
Telescopic rod
The telescopic rod can be used to secure the load against the rear seats to prevent it from moving around.
– To install: insert one bracket 2 into both the left and the right loading rails and slide it to the desired position.
– Insert telescopic rod 1 into brackets 2 and, while doing so, press release button 4 and push the rod downwards until it engages.
– Make sure that locking button 3 on brackets 2 is pressed.
This keeps brackets 2 in place on the loading rail.
– To remove: press release button 4 on respective bracket 2 and remove telescopic rod 1 by pulling it upwards and out.
Stowage well under the cargo compartment floor
A removable insert under the trunk floor contains the parts of the EASY-PACK loadsecuring kit. The tire-change tool kit is stored beneath this insert.
– To open: open the tailgate.
– Holding the ribbing, press handle 1 downwards 2.
Handle 1 folds upwards.
– Swing the trunk floor upwards using handle 1 until it rests against the cargo compartment cover.
– Fold out hook 3 on the underside of the trunk floor in the direction of the arrow.
– Attach hook 3 to the cargo compartment's upper seal 4.
– To close: detach hook 3 from the cargo compartment's upper seal 4.
– Fasten hook 3 to the bracket on the underside of the trunk floor.
– Fold the trunk floor down.
– Press the trunk floor down 2 until it engages.
Roof carrier
Important safety notes
WARNING
Only use carriers when the basic carrier bars
have been completely mounted. The left and
right roof rails are only stabilized by means of
the basic carrier bars mounted.
Follow the manufacturer's installation instructions. Otherwise, an improperly attached carrier or its load could become detached from the vehicle.
Do not exceed the maximum roof load of 220 lb (100 kg).
Take into consideration that when the roof is loaded, the handling characteristics are different from those when operating the vehicle without the roof loaded.
Mercedes-Benz recommends that you
only use roof carriers that have been tested
and approved for Mercedes-Benz vehicles.
This helps to prevent damage to the vehicle.
Position the load on the roof carrier in such a way that the vehicle will not sustain damage even when it is in motion.
Depending on the vehicle equipment,
ensure that when the roof carrier is
installed you can:
- raise the sliding sunroof fully
- open the panorama roof with power tilt/sliding panel fully
- open the tailgate fully
Attaching the roof carrier
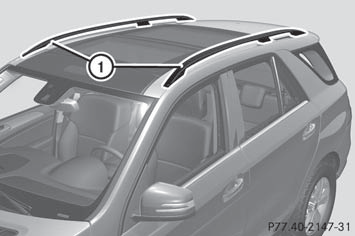
– Secure the roof carrier to roof rails 1.
– Observe the manufacturer's installation instructions.
See also:
Trip menu
Standard display
► Press and hold the button on
the
steering wheel until the Trip menu with
trip odometer 1 and odometer 2 is
shown.
Trip computer "From start" or "From
...
Driving tips
Kickdown
Use kickdown for maximum acceleration:
■ Depress the accelerator pedal beyond the
pressure point.
The transmission shifts to a lower gear
depending on the engine speed.
■ ...
Correct driver's seat position
WARNING
You could lose control of your vehicle if you
do the following while driving:
• adjust the driver's seat, head restraint,
steering wheel or mirrors
• fasten the seat belt
There is a risk ...