Stowage space
Important safety notes
WARNING
To help avoid personal injury during a collision
or sudden maneuver, exercise care when
storing objects in the vehicle. Put luggage or
cargo in the cargo compartment if possible.
Do not pile luggage or cargo higher than the seat backrests.
Keep compartment lids closed. This will help to prevent stored objects from being thrown about and injuring vehicle occupants during • braking • vehicle maneuvers • an accident
Stowage compartments in the front
Glove box
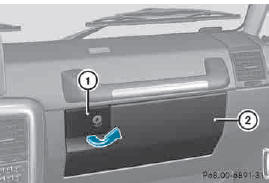
► To open: pull handle 1 and open glove box flap 2.
► To close: fold glove box flap 2 upwards until it engages.
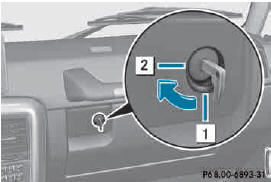
1 Glove box unlocked
2 Glove box locked
► To lock: insert the mechanical key into the lock and turn it 90° clockwise to position 2.
► To unlock: insert the mechanical key into the lock and turn it 90° counter-clockwise to position 1.
The glove box can only be locked and unlocked using the mechanical key.
Stowage compartment/telephone compartment under the armrest/in the center console
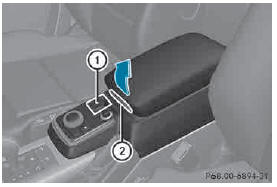
1 Small stowage compartment 2 Release button for the armrest
Stowage compartment/telephone compartment under the armrest X To open: press button 2.
► Fold up armrest.
In the stowage compartment, there is a stowage tray.
► To close: fold the armrest down.
The armrest engages audibly.
Stowage space in the rear
Stowage poc
WARNING
Storage bags are intended for storing lightweight
items only.
Heavy objects, objects with sharp edges or fragile objects may not be transported in the storage bag. In an accident, during hard braking, or sudden maneuvers, they could be thrown around inside the vehicle and cause injury to vehicle occupants.
Storage bags cannot protect transported goods in the event of an accident.
The stowage pockets are located on the rear side of the front seats.
See also:
Vehicle
...
Mirrors
Rear-view mirror
Rear-view mirror (manual anti-glare)
- anti-glare mode: flick anti-glare
switch 1 forwards or back.
Exterior mirrors
Adjusting the exterior mirrors
WARNING
Exercise care whe ...
Useful information
This Operator's Manual describes all
models and all standard and optional
equipment of your vehicle available at the
time of publication of the Operator's
Manual. Country-specific differences are
...