360° camera (surround view)
Important safety notes
The 360° camera is only an aid. It is not a replacement for your attention to your immediate surroundings. You are always responsible for safe maneuvering and parking. When maneuvering or parking, make sure that there are no persons, animals or objects in the area in which you are maneuvering.
The 360° camera may show a distorted view
of obstacles, show them incorrectly or not at
all. It cannot show objects in the following
areas:
• under the front bumper
• very close to the front bumper
• very close to the rear bumper
• under the rear bumper
• in close range above the handle on the
trunk lid
• very close to the exterior mirrors
You are always responsible for safety, and must always pay attention to your surroundings when parking and maneuvering. This applies to the areas behind, in front of and beside the vehicle. You could otherwise endanger yourself and others.
The rear view camera will not function or will
function in a limited manner:
• if the doors are open
• if the exterior mirrors are folded in
• if the trunk lid is open
• in heavy rain, snow or fog
• at night or in very dark places
• if the cameras are exposed to very bright
light
• if the area is lit by fluorescent light or LED
lighting (the display may flicker)
• if you exit a heated garage in winter,
resulting in a rapid change in temperature
• if the camera lenses are dirty or covered
• if the vehicle components in which the
cameras are installed are damaged. In this
event, have the camera position and setting
checked at a qualified specialist workshop.
Do not use the 360° camera in this case. You can otherwise injure others or cause damage to objects or the vehicle.
The 360° camera is a system consisting of four cameras.
The system analyzes images from the
following cameras:
• Rear view camera
• Front camera
• Two cameras in the exterior rear view
mirrors
The cameras capture the immediate surroundings of the vehicle. The system supports you, e.g. when parking or if vision is restricted at an exit.
The 360° camera images can be shown in full screen mode or in seven different split-screen views on the COMAND display. A split-screen view also includes a top view of the vehicle.
This view is calculated from the data supplied by the installed cameras (virtual camera).
The seven split-screen views are:
• top view and picture from the rear view
camera (130° viewing angle)
• top view and picture from the front camera
(without displaying the maximum steering
wheel angle)
• top view and enlarged rear view
• top view and enlarged front view
• top view and trailer view (vehicles with
trailer tow hitch)
• top view and pictures from the rearward
facing mirror cameras (rear wheel view)
• top view and pictures from the forward
facing mirror cameras (front wheel view)
The top view and trailer view are available for vehicles equipped with a trailer tow hitch.
When the function is active and you shift the transmission from position D or R to N, you see the previous view in the COMAND display. The dynamic guidelines are hidden.
When you change between transmission positions D and R, you see the previously selected front or rear view.
Activation conditions
The 360° camera image can be displayed if:
• your vehicle is equipped with a 360°
camera
• COMAND is switched on, see the separate
COMAND operating instructions
• the 360° camera function is activated
Activating the 360° camera using the SYS button
■ Press and hold the  button for
longer
than 2 seconds, see the separate COMAND
operating instructions.
Depending on whether position D or R is
engaged, the following is shown:
• full screen display with the image from
the front camera
• full screen display with the image from
the rear camera
Activating the 360° camera with COMAND
■ Press the  button, see the
separate
COMAND operating instructions.
■ Select System by turning  the
the
COMAND controller and press  to
to
confirm.
■ Select 360° camera and press  to
to
confirm.
Depending on whether position D or R is engaged, the following is shown: • a split screen with top view and the image from the front camera or • a split screen with top view and the image from the rear view camera
For further information about the COMAND Controller, see the separate COMAND operating instructions.
Activating the 360° camera using reverse gear
The 360° camera images can be automatically displayed by engaging reverse gear.
■ Make sure that the SmartKey is in position 2 in the ignition lock.
■ Make sure that the Activation by R gear setting is active in COMAND, see the separate COMAND operating instructions.
■ To show the 360° camera image: engage reverse gear.
The COMAND display shows the area behind the vehicle in split screen: • vehicle with guide lines • top view of the vehicle
Selecting the split-screen and full screen displays
■ To switch between split screen views:
switch to the line with the vehicle icons by
sliding  the COMAND controller.
■ Turn the COMAND controller and
select one of the vehicle symbols.
■ To switch to full screen mode: select
Full screen by turning the
COMAND controller and press to
confirm.
Displays in the COMAND display
Important safety notes
Objects not at ground level may appear to be further away than they actually are, e.g.: • the bumper of a parked vehicle • the drawbar of a trailer • the ball coupling of a trailer tow hitch • the rear section of an HGV • a slanted post Use the guidelines only for orientation.
Approach objects no further than the bottom-most guideline.
Top view with picture from the rear view camera
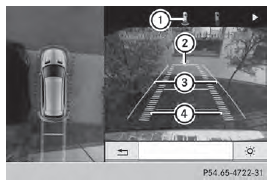
1 Symbol for the split screen setting with
top view and rear view camera image
2 Yellow guide line at a distance of
approximately 13 ft (4.0 m) from the rear
of the vehicle
3 Yellow guide line for the vehicle width
including the exterior mirrors, for current
steering wheel angle (dynamic)
4 Yellow lane marking tires at current
steering wheel angle (dynamic)

5 Yellow guide line at a distance of
approximately 3 ft (1.0 m) from the rear
of the vehicle
6 Vehicle center axle (marker assistance)
7 Red guide line at a distance of
approximately 12 in (0.30 m) from the
rear of the vehicle
8 Bumper
The guide lines are shown when the transmission is in position R.
The distance specifications only apply to objects that are at ground level.
Top view with picture from the front camera
1 Symbol for the split screen setting with
top view and front camera image
2 Yellow guide line at a distance of
approximately 13 ft (4.0m) from the front
of the vehicle
3 Yellow guide line for the vehicle width
including the exterior mirrors, for current
steering wheel angle (dynamic)
4 Yellow lane marking tires at current
steering wheel angle (dynamic)
5 Yellow guide line at a distance of
approximately 3 ft (1.0m) from the front
of the vehicle
6 Red guide line at a distance of
approximately 12 in (0.30 m) from the
front of the vehicle
Top view and enlarged rear view

1 Symbol for the split screen setting with
top view and rear view camera image
enlarged
2 Red guide line at a distance of
approximately 12 in (0.30 m) from the
rear of the vehicle
This view assists you in estimating the distance to the vehicle behind you.
This setting can also be selected as an enlarged front view.
Top view with picture from the mirror camera
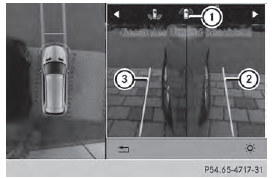
1 Symbol for the top view and forwardfacing
mirror camera setting
2 Yellow guide line for the vehicle width
including the exterior mirrors (right side
of vehicle)
3 Yellow guide line for the vehicle width
including the exterior mirrors (left side of
vehicle)
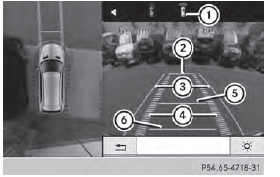
Top view with trailer view
1 Symbol for the trailer view setting 2 Trailer drawbar marker assistant 3 Red guide line at a distance of approximately 12 in (0.30 m) from the ball coupling
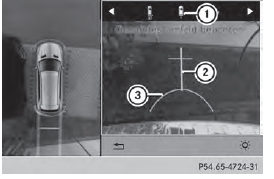
Display with the PARKTRONIC display
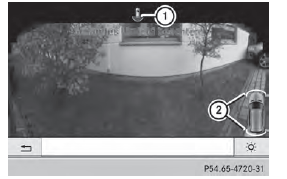
Example: full screen mode with PARKTRONIC display
1 Symbol for the full screen setting with rear view camera image If the vehicle is equipped with PARKTRONIC and the function is active , warning displays 2 in the COMAND display are also active or light up accordingly.
PARKTRONIC appears:
• in split screen view as red or yellow
brackets around the vehicle icon in the top
view, or
• in the full screen view, on the right-hand
side at the bottom as red or yellow brackets
around the vehicle icon
The full screen display can also be selected as front view.
Exiting 360° camera display mode
As soon as your vehicle exceeds a speed of
19 mph (30 km/h) with the function
activated, the function switches off. The
COMAND display switches back to the
previously selected view. You can also switch
the display by selecting the  symbol
in the
display and pressing  the COMAND
controller.
See also:
Operating the climate control system
Activating/deactivating climate
control
Important information
WARNING
When the climate control system is
deactivated, the outside air supply and
circulation are also deactivated. Only choose
t ...
ATA (anti-theft alarm system)
■ To arm: lock the vehicle with the SmartKey
or KEYLESS-GO.
Indicator lamp 1 flashes. The alarm
system is armed after approximately
15 seconds.
■ To switch off using the SmartKey:
...
Multifunction display
1 Transmission position
2 Drive program
3 Description field
4 Menu bar
5 Outside temperature or speed
6 Time
7 Transfer case position
► To show menu bar 4: press the
or button on ...